This set of Engineering Drawing Multiple Choice Questions & Answers (MCQs) focuses on “Welded Joints – 3”.
1. In pressure welding, two metal pieces are heated till plastic state at their joint.
a) True
b) False
View Answer
Explanation: Based on the processes of welding, we have pressure welding, fusion welding, and a combination of both. In pressure welding, we heat the joint to the plastic state and apply external mechanical pressure and join the two metal parts.
2. Applying external mechanical pressure, after the heating the joint to the plastic state for welding two metal parts is __________________
a) Arc welding
b) Pressure welding
c) Gas welding
d) Fusion welding
View Answer
Explanation: In pressure welding, we heat the joint of the two metal parts to a plastic state and then pressure is applied to join them permanently. Gas and arc welding comes under fusion welding, where welding puddle is produced in different ways.
3. Which of the following belongs to pressure resistance welding?
a) Arc welding
b) Gas welding
c) Spot welding
d) Forge welding
View Answer
Explanation: In pressure resistance welding, is melted by passing heavy current and then welded under external pressure. Examples of pressure resistance welding are spot welding, seam welding, flash welding, and pressure butt welding.
4. Which of the following do not belong to pressure resistance welding?
a) Spot welding
b) Seam welding
c) Arc welding
d) Pressure butt welding
View Answer
Explanation: In case of the pressure resistance welding, the joint is melted by passing heavy current and then welded under external pressure. Examples of pressure resistance welding are spot welding, seam welding, flash welding, and pressure butt welding. Arc welding comes under fusion welding.
5. What does the following symbol indicate?

a) Spot welding
b) Seam welding
c) Projection welding
d) Flash welding
View Answer
Explanation: The given symbol is used to represent flash welding, which comes under pressure resistance welding. In case of the pressure resistance welding, the joint is melted by passing heavy current and then welded under external pressure.
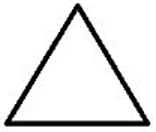
6. What does the following symbol indicate?
a) Spot welding
b) Seam welding
c) Projection welding
d) Flash welding
View Answer
Explanation: The different types of resistance weldings are symbolically represented in different ways. The given triangle indicates the projection welding which belongs to pressure resistance welding, where joint is melted by passing heavy current and then welded under external pressure.
7. The following symbol indicates _______________ form of weld.

a) Single-bevel butt
b) Spot
c) Double-U butt
d) Single-V butt
View Answer
Explanation: The given symbol indicates the weld profile of shape bevel, hence it is called as the single-bevel butt joint. The two welded metal part ends are profiled in a way when joined forms a bevel shape and filler material is fused in to join them.
8. Where do we give the relative cross-section dimension of the welding portion in the conventional representation of the welded joints?
a) Top of the symbol
b) Bottom of the reference line
c) Left-hand side of the symbol
d) Right-hand side of the symbol
View Answer
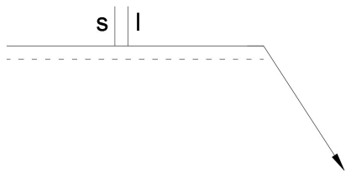
Explanation: When representing welded joints, weld symbol is accompanied by the relative cross-section dimension of the weld on the left-hand side of the weld symbol. The following symbol is one such example, where s represents the cross-section dimension.
9. Where do we give the longitudinal dimension of the welding portion in the conventional representation of the welded joints?
a) Top of the symbol
b) Bottom of the reference line
c) Left-hand side of the symbol
d) Right-hand side of the symbol
View Answer
Explanation: When representing welded joints, weld symbol is accompanied by the relative cross-section dimension and the longitudinal dimension of the weld on the right-hand side of the weld symbol. The following symbol is one such example, where l represents the longitudinal dimension of the weld.

10. What does the letter a indicate in the fillet weld dimensioning?
a) cross-section
b) longitudinal dimension
c) throat thickness
d) leg length
View Answer
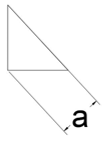
Explanation: The dimensioning of the fillet weld is done using two ways, either we represent throat thickness or the leg length. They are placed in front of the weld symbol. This is indicated as follows, where a is throat thickness.
11. What does the letter z indicate in the fillet weld dimensioning?
a) cross-section
b) longitudinal dimension
c) throat thickness
d) leg length
View Answer
Explanation: The dimensioning of the fillet weld is done using two ways, either we represent throat thickness or the leg length. They are placed in front of the weld symbol. This is indicated as follows, where Z is leg length.

12. From the given dimension find the throat thickness of the fillet weld?
a) 5
b) 7.07
c) 200
d) 1000
View Answer
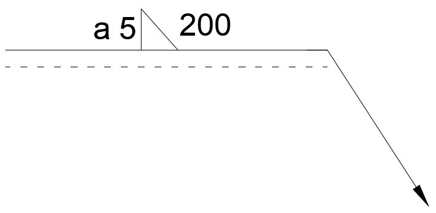
Explanation: The dimensioning of the fillet weld is done using two ways, either we represent throat thickness a, or the leg length z. Here a is indicated and is given 5 units, which indicates that the throat thickness can be taken as can be 5units.
13. From the given dimension find the throat leg thickness of the fillet weld?

a) 5
b) 7.07
c) 200
d) 1000
View Answer
Explanation: The dimensioning of the fillet weld is done using two ways, either we represent throat thickness a, or the leg length z. Here a is indicated and is given 5 units, from which leg length z can be
calculated,
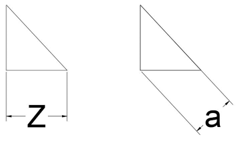
From the figure, we know that Z = a*√2, hence z = 5*1.414 which equals to 7.07units.
14. From the given dimension find the throat longitudinal length of the fillet weld?

a) 5
b) 7.07
c) 200
d) 1000
View Answer
Explanation: The dimensioning of the fillet weld is done using two ways, we represent throat thickness a, or the leg length z, they are on the left side of the symbol and the longitudinal length is placed to the right-hand side of the symbol. Hence it is taken as 200 units.
15. What does the symbol C in surface finishing representation of weld indicates?
a) Chipping
b) Churning
c) Cleaning
d) Curving
View Answer
Explanation: After welding and cleaning, surface finishing needs to be done, it is indicated in weld representation by different symbols, where C indicates chipping.
Sanfoundry Global Education & Learning Series – Engineering Drawing.
To practice all areas of Engineering Drawing, here is complete set of 1000+ Multiple Choice Questions and Answers.
If you find a mistake in question / option / answer, kindly take a screenshot and email to [email protected]
