Before you go on with this class you must ensure that you have your development environment set up , for ensuring this you need to have the following :
1. Download the Android SDK.
2. Install the ADT plugin for Eclipse (as we will be using eclipse as our ide).
3. Download the latest SDK tools and platforms using the SDK Manager.
If you haven’t already done these tasks, start by downloading the Android SDK and follow the installing steps once you have all this you are ready to begin with this class.
Creating an Android Project with Eclipse
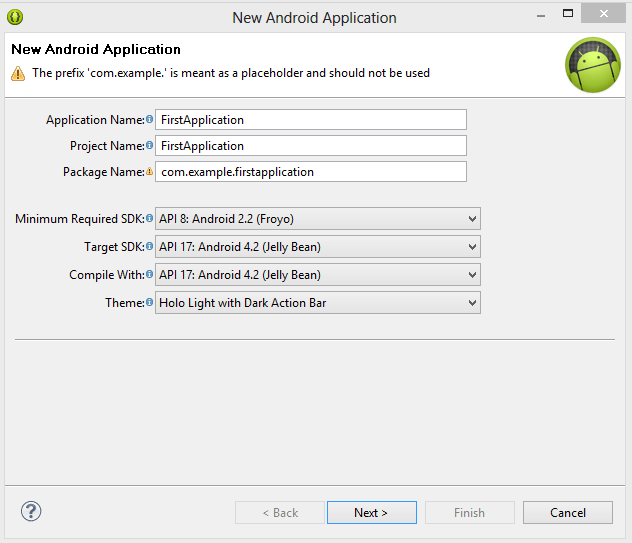
1.Now when you launch eclipse, start with creating a new project by clicking New in the toolbar and select Android Application project.
2.Now fill in the form that appears.
3.On the next screen to configure the project, leave the default selections and click Next.
4.The next screen can help you create a launcher icon for your app.You can either customize your launcher using the settings provided or you can use the default and click Next.
5.Now you can select an activity template from which to begin building your app.
For this project, select BlankActivity and click Next.
Leave all the details for the activity in their default state and click Finish.
Now developing an application in android requires you to code in two formats first in Java to provide functionality to your activity/code and second Xml to set the layout for your activity.
Now let me explain to you a little bit about an activity in Android an activity is basically the screen that you see for e.g. when you open a web browser remember that it is an Application and when you open a new tab in the browser it means that you have actually opened up a new activity in the web browser, as you can open multiple tabs in your web browser or different activities in your browser it means that you have multiple activities in application your web browser similarly u can have multiple activities in your android application.
In this example i have created a class that cointains a single Activity or the MainActivity and its corresponding Xml as Main Xml.
Both the codes Main Activity as well as its corresponding layout code Xml are given below.
package com.example.hello_android_sanfoundry;

import android.os.Bundle;
import android.app.Activity;
import android.view.Menu;

public class MainActivity extends Activity {

    @Override
    protected void onCreate(Bundle savedInstanceState) {
        super.onCreate(savedInstanceState);
        setContentView(R.layout.activity_main);
    }

    @Override
    public boolean onCreateOptionsMenu(Menu menu) {
        // Inflate the menu; this adds items to the action bar if it is present.
        getMenuInflater().inflate(R.menu.main, menu);
        return true;
    }

}
This is the Xml code.
<RelativeLayout xmlns:android="http://schemas.android.com/apk/res/android"
    xmlns:tools="http://schemas.android.com/tools"
    android:layout_width="match_parent"
    android:layout_height="match_parent"
    android:paddingBottom="@dimen/activity_vertical_margin"
    android:paddingLeft="@dimen/activity_horizontal_margin"
    android:paddingRight="@dimen/activity_horizontal_margin"
    android:paddingTop="@dimen/activity_vertical_margin"
    tools:context=".MainActivity"
    >

    <!-- This is a comment -->


    <!-- Create your comments like this -->

    <TextView
        android:id="@+id/textView2"
        android:layout_width="wrap_content"
        android:layout_height="wrap_content"
        android:layout_alignLeft="@+id/textView1"
        android:layout_alignParentTop="true"
        android:layout_marginTop="18dp"
        android:text="@string/hello_sanfoundry_android" />

    <TextView
        android:id="@+id/textView1"
        android:layout_width="match_parent"
        android:layout_height="wrap_content"
        android:layout_alignParentLeft="true"
        android:layout_alignParentTop="true"
        android:layout_marginTop="53dp"
        android:text="This is a Large Text View"
        android:textAppearance="?android:attr/textAppearanceLarge" />

    <TextView
        android:id="@+id/textView3"
        android:layout_width="wrap_content"
        android:layout_height="wrap_content"
        android:layout_alignLeft="@+id/textView1"
        android:layout_below="@+id/textView1"
        android:layout_marginTop="16dp"
        android:text="This is Medium Text View"
        android:textAppearance="?android:attr/textAppearanceMedium" />

    <TextView
        android:id="@+id/textView4"
        android:layout_width="wrap_content"
        android:layout_height="wrap_content"
        android:layout_alignLeft="@+id/textView3"
        android:layout_below="@+id/textView3"
        android:layout_marginTop="14dp"
        android:text="Small Text"
        android:textAppearance="?android:attr/textAppearanceSmall" />

    <Button
        android:id="@+id/button1"
        android:layout_width="wrap_content"
        android:layout_height="wrap_content"
        android:layout_alignLeft="@+id/textView4"
        android:layout_below="@+id/textView4"
        android:layout_marginTop="16dp"
        android:text="Button" />

    <ToggleButton
        android:id="@+id/toggleButton1"
        android:layout_width="wrap_content"
        android:layout_height="wrap_content"
        android:layout_alignBaseline="@+id/button2"
        android:layout_alignBottom="@+id/button2"
        android:layout_alignParentRight="true"
        android:text="ToggleButton" />

    <Button
        android:id="@+id/button2"
        style="?android:attr/buttonStyleSmall"
        android:layout_width="wrap_content"
        android:layout_height="wrap_content"
        android:layout_alignTop="@+id/button1"
        android:layout_centerHorizontal="true"
        android:text="Small Button" />

    <CheckBox
        android:id="@+id/checkBox1"
        android:layout_width="wrap_content"
        android:layout_height="wrap_content"
        android:layout_alignRight="@+id/toggleButton1"
        android:layout_below="@+id/toggleButton1"
        android:layout_marginTop="93dp"
        android:text="CheckBox" />

    <CheckedTextView
        android:id="@+id/checkedTextView1"
        android:layout_width="wrap_content"
        android:layout_height="wrap_content"
        android:layout_alignBaseline="@+id/checkBox1"
        android:layout_alignBottom="@+id/checkBox1"
        android:layout_alignLeft="@+id/button1"
        android:text="CheckedTextView" />

    <RadioButton
        android:id="@+id/radioButton1"
        android:layout_width="wrap_content"
        android:layout_height="wrap_content"
        android:layout_alignLeft="@+id/checkedTextView1"
        android:layout_below="@+id/checkBox1"
        android:layout_marginTop="34dp"
        android:text="RadioButton" />

    <RadioButton
        android:id="@+id/radioButton2"
        android:layout_width="wrap_content"
        android:layout_height="wrap_content"
        android:layout_alignLeft="@+id/radioButton1"
        android:layout_below="@+id/radioButton1"
        android:text="RadioButton" />

</RelativeLayout>
Running Your Application
Now you can run your Android code either on your Android device or through Android Emulator. I will be telling you to run your application on Android Emulator for this you need to set up your Android Virtual Device that would run your code , now to set up a Android Virtual Device or AVD you need to create one using the Android Virtual Device Manager or the AVD Manager, in order to do so follow these steps –
1.Open up the AVD Manager.
2.In the Android Virtual Device Manager panel, click New.
3.Fill in the details for the AVD. Give it a name, a platform target, an SD card size, and a skin (HVGA is default).
4.Click Create AVD.
5.Select the new AVD from the Android Virtual Device Manager and click Start.
6.After the emulator boots up, unlock the emulator screen.
Now in eclipse open up one of your project files and click the run button or right click on your project name in the project hierarchy and click Run As and select Android Application.
Be patient as the Android Virtual Device takes some time to load up.
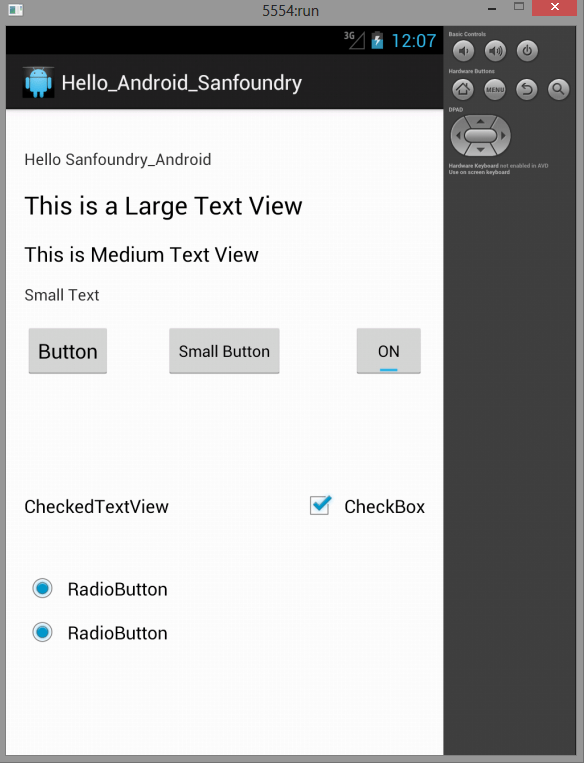
The output is shown below.
Sanfoundry Global Education & Learning Series – 100+ Java Android Tutorials.
- Practice BCA MCQs
- Check Programming Books
- Practice Programming MCQs
- Apply for Computer Science Internship
- Check Java Books