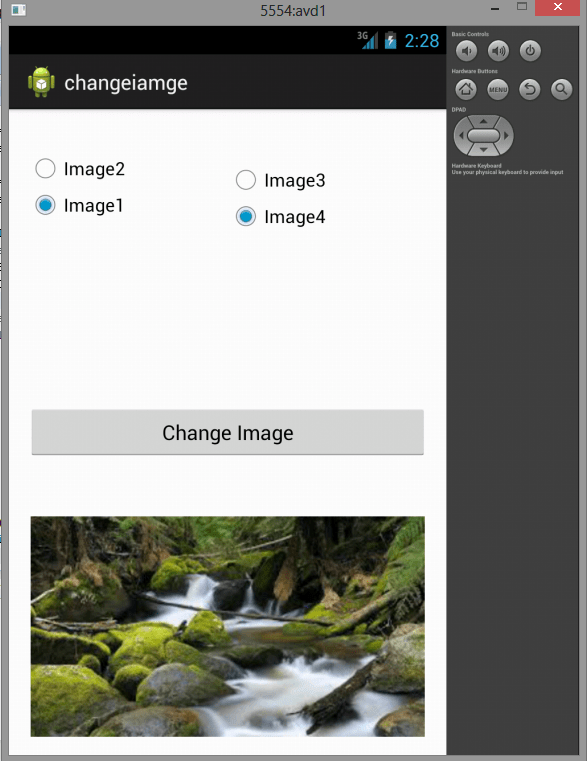
Here is source code of the Program to Change the Image Displayed on the Screen in Android. The program is successfully compiled and run on a Windows system using Eclipse Ide. The program output is also shown below.
Note
Remember to put your images in res/drawable-hdpi/ directory and then clean your project in order to use the images in your current working Application.
Main Activity
package com.example.changeiamge;

import android.app.Activity;
import android.graphics.Typeface;
import android.os.Bundle;
import android.renderscript.Type;
import android.view.Gravity;
import android.view.View;
import android.widget.Button;
import android.widget.EditText;
import android.widget.ImageView;
import android.widget.RadioGroup;
import android.widget.RadioGroup.OnCheckedChangeListener;
import android.widget.TextView;

public class MainActivity extends Activity implements OnCheckedChangeListener {

    RadioGroup group1, group2;
    Button gen;
    ImageView img;

    @Override
    protected void onCreate(Bundle savedInstanceState) {
        // TODO Auto-generated method stub
        super.onCreate(savedInstanceState);
        setContentView(R.layout.activity_main);

        group1 = (RadioGroup) findViewById(R.id.rg1);
        group1.setOnCheckedChangeListener((OnCheckedChangeListener) this);

        group2 = (RadioGroup) findViewById(R.id.rg2);
        group2.setOnCheckedChangeListener((OnCheckedChangeListener) this);

        img = (ImageView) findViewById(R.id.imageView1);
        // oncheckedChanged function
        gen = (Button) findViewById(R.id.button1);
        gen.setOnClickListener(new View.OnClickListener() {

            @Override
            public void onClick(View v) {
                // TODO Auto-generated method stub

            }
        });

    }

    @Override
    public void onCheckedChanged(RadioGroup group, int checkedId) {
        // TODO Auto-generated method stub
        switch (checkedId) {
        case R.id.radioButton1:
            img.setImageResource(R.drawable.image4);
            break;

        case R.id.radioButton2:
            img.setImageResource(R.drawable.image5);
            break;

        case R.id.radioButton3:
            img.setImageResource(R.drawable.image6);
            break;

        case R.id.radioButton4:
            img.setImageResource(R.drawable.image7);
            break;

        default:
            break;
        }
    }
}
ActivityMain.xml
<RelativeLayout xmlns:android="http://schemas.android.com/apk/res/android"
    xmlns:tools="http://schemas.android.com/tools"
    android:layout_width="match_parent"
    android:layout_height="match_parent"
    android:paddingBottom="@dimen/activity_vertical_margin"
    android:paddingLeft="@dimen/activity_horizontal_margin"
    android:paddingRight="@dimen/activity_horizontal_margin"
    android:paddingTop="@dimen/activity_vertical_margin"
    tools:context=".MainActivity" >

    <LinearLayout
        android:layout_width="match_parent"
        android:layout_height="wrap_content"
        android:orientation="horizontal"
        android:paddingBottom="40px"
        android:weightSum="2" >

        <RadioGroup
            android:id="@+id/rg1"
            android:layout_width="wrap_content"
            android:layout_height="match_parent"
            android:layout_weight="1"
            android:orientation="vertical" >

            <RadioButton
                android:id="@+id/radioButton1"
                android:layout_width="wrap_content"
                android:layout_height="wrap_content"
                android:layout_alignParentRight="true"
                android:layout_alignParentTop="true"
                android:layout_marginTop="20dp"
                android:text="Image2" />

            <RadioButton
                android:id="@+id/radioButton2"
                android:layout_width="wrap_content"
                android:layout_height="wrap_content"
                android:layout_alignBaseline="@+id/radioButton1"
                android:layout_alignBottom="@+id/radioButton1"
                android:layout_alignParentLeft="true"
                android:text="Image1" />
        </RadioGroup>

        <RadioGroup
            android:id="@+id/rg2"
            android:layout_width="wrap_content"
            android:layout_height="match_parent"
            android:layout_weight="1"
            android:orientation="vertical" >

            <RadioButton
                android:id="@+id/radioButton3"
                android:layout_width="wrap_content"
                android:layout_height="wrap_content"
                android:layout_marginTop="30dp"
                android:text="Image3" />

            <RadioButton
                android:id="@+id/radioButton4"
                android:layout_width="wrap_content"
                android:layout_height="wrap_content"
                android:layout_alignBaseline="@+id/radioButton3"
                android:layout_alignBottom="@+id/radioButton3"
                android:layout_alignParentRight="true"
                android:text="Image4" />
        </RadioGroup>
    </LinearLayout>

    <Button
        android:id="@+id/button1"
        android:layout_width="wrap_content"
        android:layout_height="wrap_content"
        android:layout_alignParentLeft="true"
        android:layout_alignParentRight="true"
        android:layout_centerVertical="true"
        android:text="Change Image" />

    <ImageView
        android:id="@+id/imageView1"
        android:layout_width="wrap_content"
        android:layout_height="wrap_content"
        android:layout_alignLeft="@+id/button1"
        android:layout_alignParentBottom="true"
        android:layout_alignParentRight="true"
        android:layout_below="@+id/button1"
        android:layout_marginTop="50dp"
        android:src="@drawable/ic_launcher" />

</RelativeLayout>
advertisement
advertisement
Sanfoundry Global Education & Learning Series – 100+ Java Android Tutorials.
If you wish to look at all Tutorials, go to Java Android Tutorials.
If you find any mistake above, kindly email to [email protected]Related Posts:
- Practice Programming MCQs
- Check Programming Books
- Check Java Books
- Apply for Computer Science Internship
- Practice BCA MCQs
